How to Hack an Anthropologie-Inspired Planter
It’s week 2 of the One Room Challenge and boy am I ever behind schedule! I said “yes” too many times and “no” not enough. It’s how I always get stuck. If you’re just joining me, you can view my plan for the challenge in this post.
Although we knew we would be in the thick of a double room makeover, The Husband and I agreed to host overnight guests this weekend. In case you’re wondering… YES, we are borderline crazy. Ha! But we love this family so much that we just couldn’t say no. Ahem…Did I mention that there are 10 of them? Thankfully, only 5 decided to come and we had a blast! But still…
Affiliate links may be included in this post. This means that should you purchase a linked product, I may receive a small commission, but at no additional cost to you. To read my full disclosure click here.

Week 1 (the plan) // Week 2 (the planter hack) **YOU ARE HERE // Week 3 (that wallpaper tho’!) // Week 4 (pink chair covers) // Week 5 (zebra shades) // Week 6 The Reveal
Despite my obvious lack of self-regulation, I’ve managed to come up with something worthy to show you. Even this is yet another example of me saying “yes” when I really meant to say “no”. You see, during my previous two participations in the ORC, I was up to my eyeballs in DIY’s. Stringing that chandelier for the Fall 2017 hallway makeover, for example, nearly did me in. The goal this time around was to lessen the number of DIYs for this makeover.
But one day, while browsing ideas on what to do with The Beast (the red emerald plant in my dining room featured in this post) this image rolled up my screen:

It’s a planter that was once sold by my favorite store, Anthropologie. Regular readers of this blog know that Anthro is my go-to spot for inspiration on all things bohemian chic. Unfortunately Anthro no longer sells this planter. I’m certain that even if it was still available, I would not be able to afford it.
Although I was able to locate similar versions on Overstock and Amazon, they were either too small, not tiered, or the wrong texture or size. So I decided to take the plunge and recreate the look myself. Let me warn you though, this is a hack INSPIRED BY Anthropologie, so my results are quite different than the original.
My cost for this project was approximately $35. Here’s how it breaks down:
$9.99 medium planter bowl (12” dia) Purchased from TJMaxx **
$14.99 large planter bowl (14” dia) Purchased from TJMaxx**
$4.50 rope
$3.50 hanging supplies
GRAND TOTAL: $32.98 + tax = $35.00 +/-
**The bowls featured in the original are prettier, but the ones I found are also good substitutes.
How I Hacked the Anthro Planter
Scale of Difficulty: 1.5 out of 5 (for those using a chain to connect the bowls) // 2.5 of 5 for those using rope
Estimated Time: 30-45 minutes (Yeah, that’s what I’m talkin’ bout!)
Items You Will Need
2 Hammer head planter bowls in your desired size. I used 12 and 14 inch diameter bowls.
Rope or chain to connect the two bowls
A heavy duty round ring (I used this one)
Ceiling hook or shelf bracket (I used this shelf bracket)
Masking tape
Black marker
Cordless drill with drill bits appropriate for drilling through metal
Safety glasses
Gloves
Gold/Antique gold Rub n Buff (optional)
I recommend reading through the instructions entirely before attempting your own planter hack. Here we go…
Step 1: Divide Planter into 3 Even Sections
The easiest way to do this without a protractor is to make a “peace” or Mercedes Benz symbol along the lip of the bowl using masking tape. Continue moving the tape around and measuring until there are equal distances between all three sections.

Step 2: Mark 3 Holes on Each Bowl
With the masking tape still in place, mark the areas where the hanging holes will be drilled DIRECTLY ON THE MASKING TAPE. The masking tape will:
Protect the bowl from scratches when drilling
Give the drill bit some traction as you drill
Help you create a less jagged hole
Step 3: Start Drilling Holes Using the Smallest Drill Bit
Start drilling the holes using the smallest drill bit available in your tool box. Gradually increase the size of the drill bit until you’ve reached your desired hole size.

Step 4: Create the Tiers
If using a chain to connect your bowls:
Simply count out the same number of chain links to create an equal distance vertically between the bowls.
Attach the chain to the holes using connectors.
Gather the three chains at the top and feed them into the heavy duty ring.
Voila, you are done!
I wanted a more organic look so I used rope. NOTE: Using rope will make balancing the bowls a bit more challenging. But it’s still not hard to do. You’ll just need someone to help you keep your planter from becoming lopsided as you work. Here are the steps I took:
Measure off a long strand of rope and fold it in half. When folded the rope should still be long enough to hang both bowls. Repeat 2 more times for a total of 3 ropes.
Using one of the ropes, determine the desired distance between the top and bottom bowls and mark the distance with a marker or a piece of masking tape. Repeat with the remaining 2 ropes using your first rope as a guide.
Now that your ropes have been marked, feed one rope (still doubled) through one hole of the bottom bowl
Tie a cow hitch knot. Don’t know what that is? Click here for a photo.
Repeat steps C and D for the remaining holes in the bottom bowl
Find your distance mark and tie a standard knot (actually called a two-strand overhand knot). IMPORTANT: This knot will act as a stopper to keep the top tier in place. Repeat for remaining 2 double strand rope sets.
Gather the loose rope strands together, thread them through the heavy duty ring, and bend them to create a loop.
Using a separate piece of rope, and keeping the ring in place, tie a knot in through the loop and tighten
Wrap the added rope neatly around the 6 strands until it resembles something like a clinch knot. Tie it again to secure.
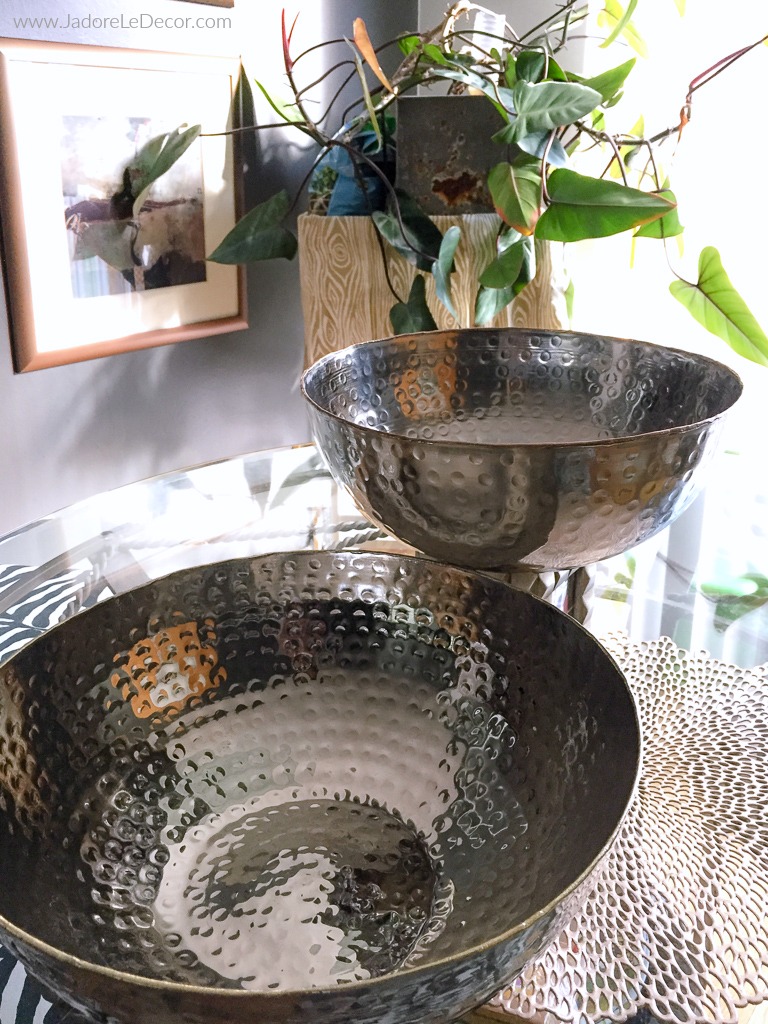
All that’s needed now is a place to hang it. Hanging it from the ceiling wasn’t an option for me, so I’ve mounted mine using a wall bracket. After hanging it, I hit it with just a tad bit of Rub n Buff to add a hint of gold, but still allowed some of the silver to shine through.
With this little addition, my dining room corner went from this…

To this!


I have to admit that I wasn’t immediately in love with the look. However, my husband convinced me to wait until daylight to get a better look at it. He was right. It really looks better than I first thought and has grown on me in a short span of time.
But I think I’ll need to prune back some of the leaves for a lighter feel, and to at least see more of the planter. In the meantime, this was the perfect little hack for this dining room corner. It will certainly make cleaning the floor a lot easier. Funny… that little reward was actually what started this in the first place.
Next week I’ll finally share my to-do list with you. For now though, please let me know in the comments below what you thought of this hack.
One Room Challenge Schedule:
Week 1 // Week 2 (you are here) // Week 3 // Week 4 // Week 5 // Week 6 The Reveal