My Clever Way of Giving a New Look to an Old Mirror
As much as I love decor and design, I'll be the first to admit that sometimes I just don't feel like spending money for something new. Especially if the new item doesn't match (or surpass) the quality and uniqueness of the old one.
Having said that, I have this mirror in my dining room that had been grating on my nerves for some time. It's a nice, sturdy, and rather large piece that I got for a steal at a going-out-of-business sale years ago. But as my tastes have shifted over the years, this mirror simply did not keep up.
Affiliate links may be included in this post. This means that should you purchase a linked product, I may receive a small commission, but at no additional cost to you. To read my full disclosure click here.
Think Outside the Box Before Ditching Your Old Furniture
After changing my dining room paint color from the Ralph Lauren's Fox Red to Benjamin Moore's Kendall Charcoal, I suddenly found the blonde wood of the mirror to be a bit off-putting. To make matters worse, it has a slick sheen finish that gave it 90's vibe. Below is the guilty subject.

See what I mean? Very...bland indeed. So I started to brainstorm about ways I could change it a bit. Paint it? No...If I don't like it, then I'm stuck. Cover it with fabric? Nah...that would make it look even more dated. Découpage it? Uh...NO.
Then an idea suddenly struck me. I scurried to my craft room excitedly like a chicken with my head cut off, looking for something that would help me re-create the vision in my head. After a bit of rummaging, I came up with these items.

I promise you that this is the cheapest and easiest upgrade I've ever performed on anything. In fact, the photo above shows ALL of the steps required (from left to right). Just trace, cut, and fill in the cutout by gluing on the beads. DONE!
Material Used for a Simple Mirror Upgrade
- A glue gun
- Shiny beaded string (from a wedding I styled)
- 1 Translucent plastic cutting mat from the Dollar Tree.
- Scissors
- A printout of an Ogee shape (from the internet), which I traced
- Command strip double sided tape
- To this day I don't know what made me purchase those translucent cutting mats from Dollar Tree, because I never used them. That is SO unlike me. But this time it worked in my favor.


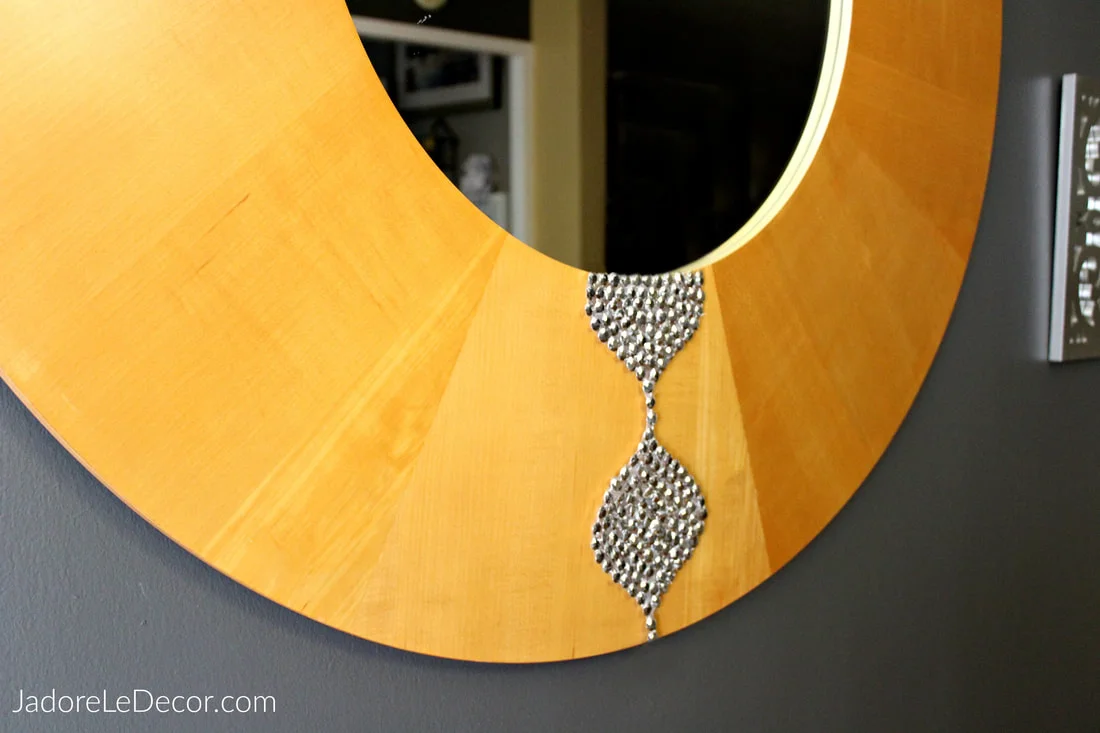


et the DIYer beware: if you're planning to attempt a similar makeover, know that a little bit of bling goes a long way! I can't imagine what this would have looked like had I attempted to bling out the entire mirror. But what I love most about this makeover is that if it ever grows old, I can just remove the appliqués and start over with a new idea. Love that!
Now it's your turn. Tell me:
- Have you ever styled up a piece of furniture or accessory in your home?
- Or, what is one item in your home that you wish you could style up?

One more favor may I ask of you?
If you enjoyed this post
Please share, tweet or pin it.
Merci Beaucoup!
