
How To Paint Stripes Like a Boss
Everyone knows that the easiest and least expensive way to change a room is with paint. But most shy away from using it to add graphical interest to their walls. Stripes are an affordable way to create a striking focal point in an otherwise stark room.
A bit scary, yes. But the beauty of it is that we’re not talking about a sofa, or dining room table, or permanent construction. If you make a mistake, remember, it’s just paint.
Affiliate links may be included in this post. This means that should you purchase a linked product, I may receive a small commission, but at no additional cost to you. To read my full disclosure click here.
In a previous post I promised to dish the details about how to paint horizontal stripes. I recently attempted this feat for the first time, and the results were quite amazing. The color I chose for the stripes is Sherwin-Williams Peppercorn SW 7674. I was able to complete the entire project with a $7 can of sample paint. Below are the step by step instructions.
How to Paint Horizontial Wall Stripes
Step 1: Gather Your Supplies
- Drop cloth
- 1” or 2” safe release blue painters tape
- Small to medium size roller, and roller pan
- Pencil, or chalk to score the lines
- Tape measure, leveler, and a straight edge
- Paint
Step 2: Determine Your Look
Do you prefer vertical or horizontal stripes? Vertical stripes can make a room with low ceilings feel taller, while horizontal stripes make a small cramped space feel wider and more spacious. This tutorial explains how to paint horizontal stripes.
Step 3: Do the Math
Here’s where things get a little tricky. The spacing of the stripes should be symmetrical. After researching numerous ways to measure for horizontal stripes, I settled on this equation from Young House Love. But there’s more than one way to do this, so feel free to research the method that works best for you.
- How many horizontal stripes do you want the wall to have? Now, take that number, multiply it by 2, then subtract 1. Since I wanted 5 stripes the equation was: x 2 = 10 minus 1 = 9
- Measure the height of the wall – in inches. (My basement wall measures just under 7 feet tall, at approximately 80 inches)
- Take the height of the wall (80 inches in this example) and divide that number by the numerical result in part 1 above.
- So, 80 inches divided by 9 = 8.88 inches. This final number represents the thickness of each stripe.
Step 4: Score the Lines – A Two-Person Job
Continuing with the measurements above, I settled on 8⅞ inches for the width of my stripes. By pure coincidence, I had a booklet that measured exactly 8⅞ and used it to as a guide. So starting from the floor up, I placed a pencil mark every 8⅞ inches. I then used a long straight edge and leveler to draw my lines across the wall. My husband held one end of the straight-edge while periodically checking with the leveler to make sure the line would be straight. I drew the lines. This process took about 30 minutes.
tep 5: Start Taping
With the hard part behind us, it was time to tape off the areas. Using your pencil, use an “X” to mark the spaces between the lines that WILL be painted. Why? The sections that will be painted will have tape along the outside of the line markings. The tape will be on the inside of the sections that will not be painted. If this doesn’t make sense, see the photo below. The markings will also confirm that you end up with the right number of stripes.
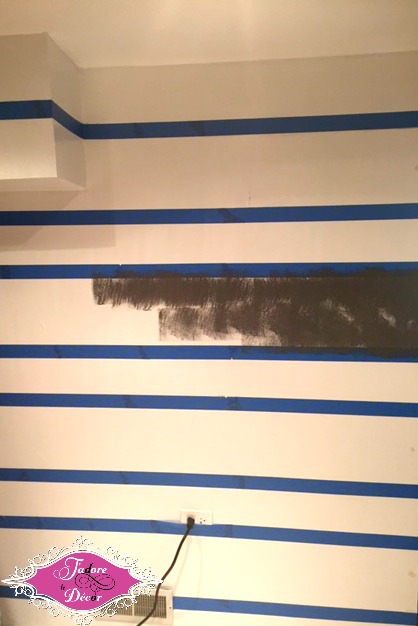
Notice that the areas to be painted appear wider than the unpainted areas due to the placement of the tape. Also, a thin coat keeps the paint from bleeding underneath the tape.
Step 6: Start Painting
Starting at the bottom, apply two thin coats of paint inside each of the wider spaces to form the stripes. The trick is to use very little paint on the roller brush and roll away from - not towards the edges of the tape. This will reduce or even eliminate paint from getting underneath the tape.
Step 7: Peel the Tape
BEFORE the paint dries completely – actually – as soon as you’ve completed the last stripe. Peel off the tape. This will ensure that your lines are crisp. It will also give you an opportunity to fix any mistakes.
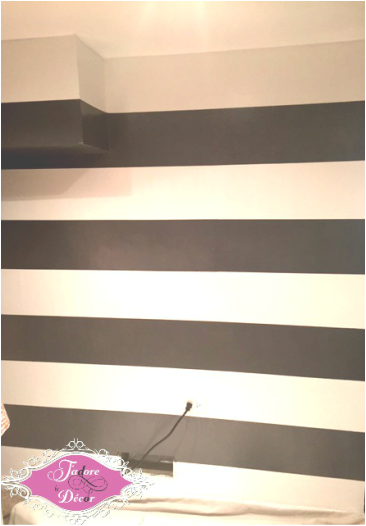
So there you have it - painted horizontal stripes. I'm still waiting for a signature piece to compliment the wall. But here is how I've styled it for now.

Did you notice that I ended up with 4 gray stripes instead of 5? What happened? Well, 1) I decided that I wanted to keep my baseboards white. And 2) as you can see in the photo, dry walled heating ducts and pipes in basements often create annoying pop-outs. I needed to use the dark paint to minimize this intrusion. So I inverted the colors, allowing the dark gray paint to hit in just the right spots. I couldn't be more pleased with the results.
s there a wall in your home that could use a splash of personality? This painting technique might just be the answer. Tell me, what are your thoughts on stripped walls?

