
Transform Your Space: How to Create an Inverted Beveled Fireplace Surround
This next DIY project was so challenging, my taxed-out brain wouldn’t even allow me to put the steps into writing until now.

While this isn't the secret project, it probably should have been. It's been a long-desired item on my list: an inverted beveled fireplace.
I received a quote from a contractor to build it for $1,000, which I was more than willing to pay. However, when the contractor ghosted me, I was forced to take matters into my own hands. This is why I encourage all homeowners— especially women — to spend some time learning a few basic carpentry skills. Once you bet the basics down, you can progress from there. NOTE: I have NEVER attempted anything like this before. And NO, my husband did not build this for me, but he did help me dry fit the facing and mount the surround onto the wall.
Despite my initial fears, I decided to attempt it after hours of research and numerous sketches. Here's a list of materials I purchased for the project. I had Home Depot cut the lumber down to a manageable size. When I got home, I trimmed everything to the perfect size needed.
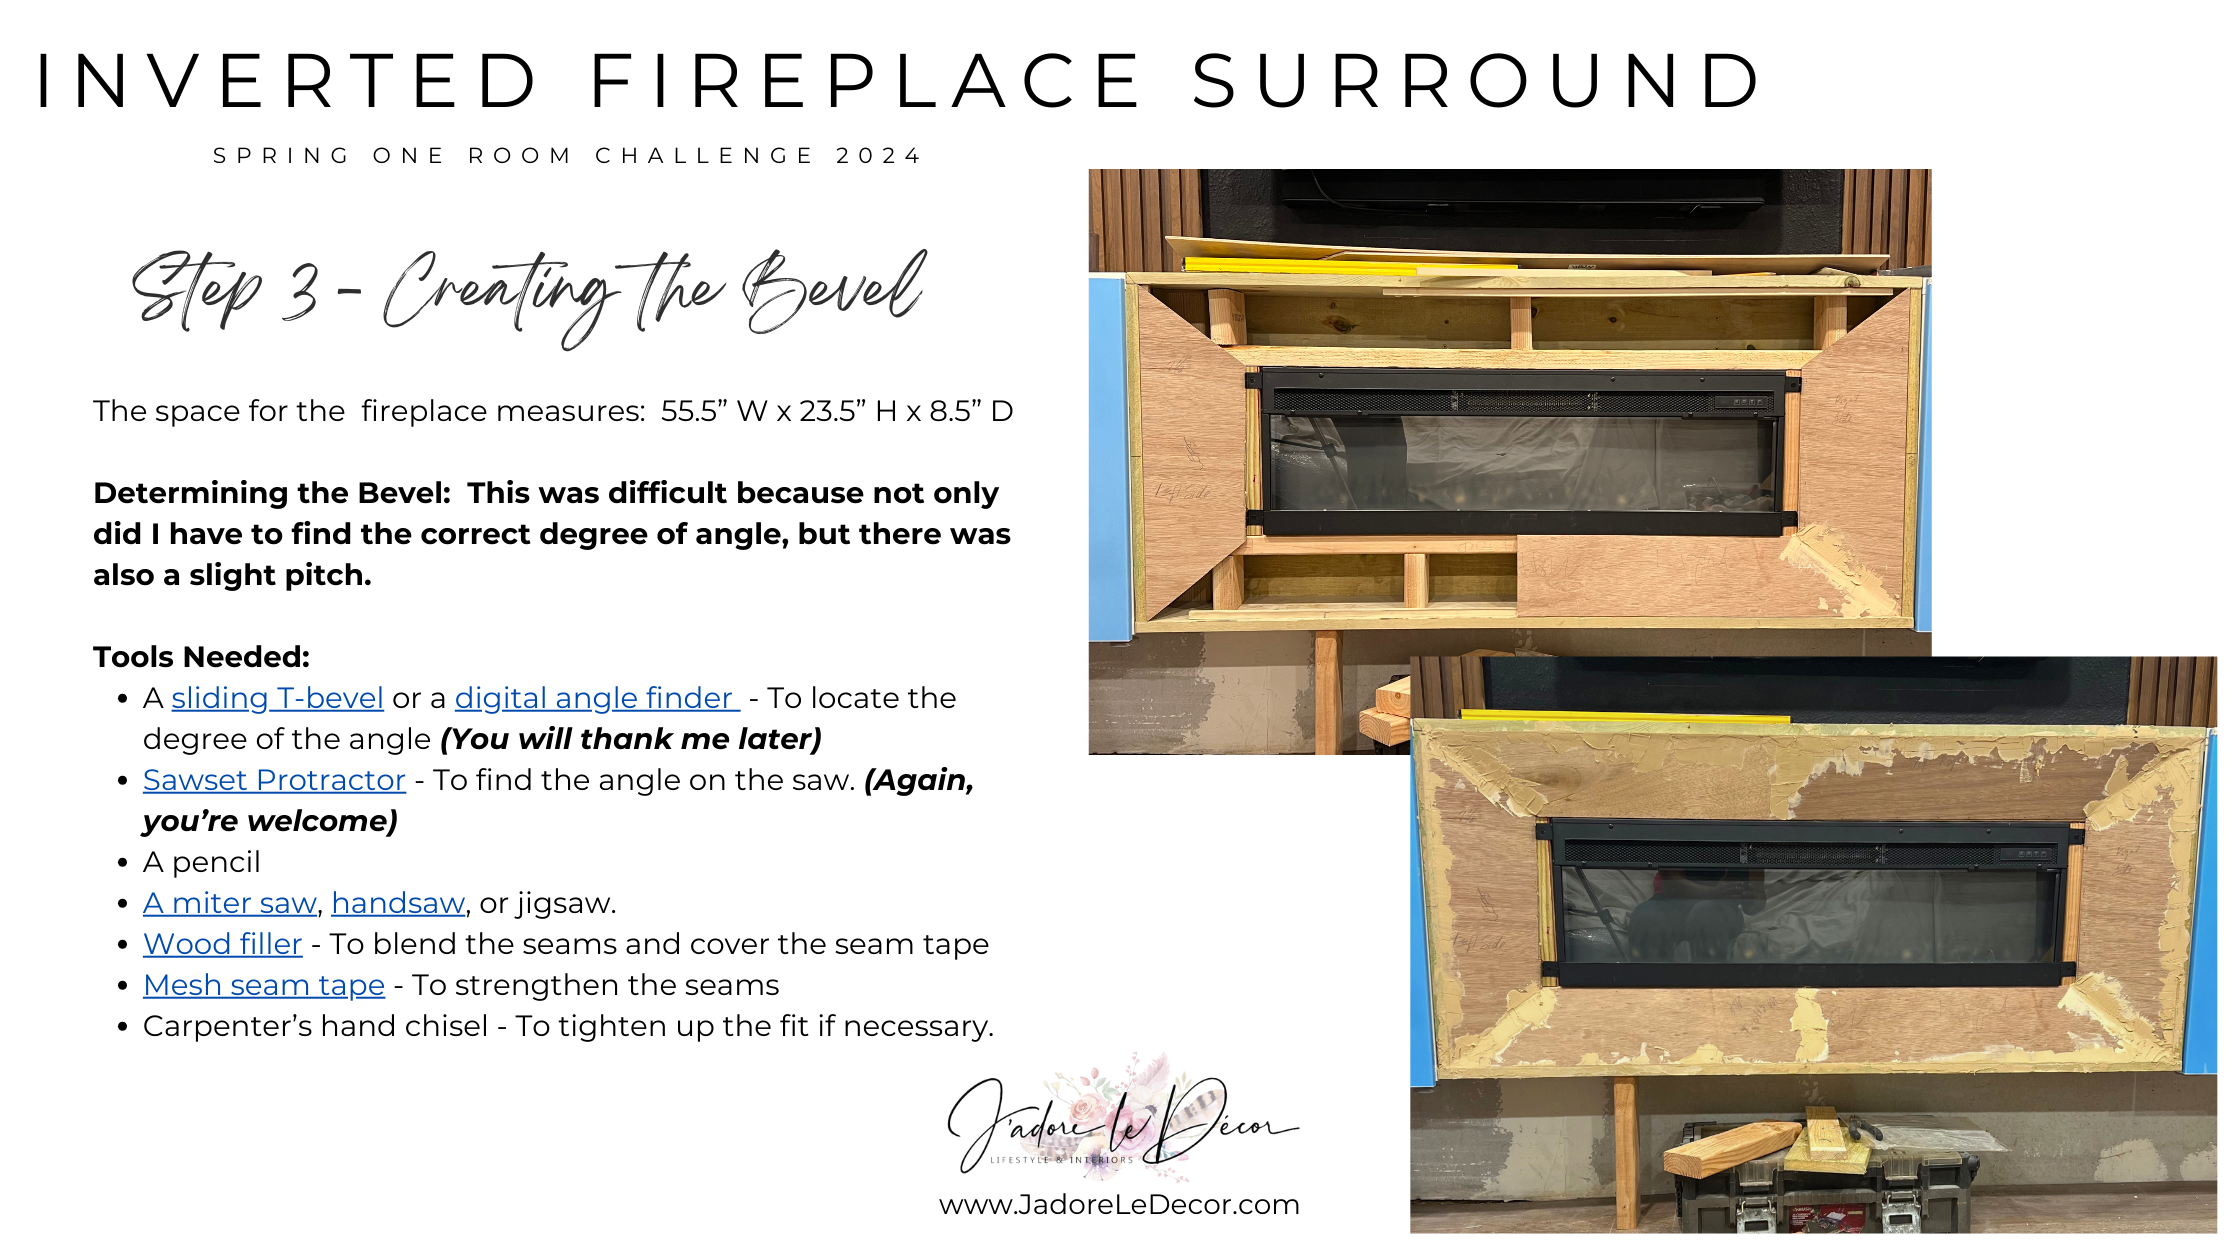
Day one was hard, and I had to proceed alone. However, after several dry fits and four hours of trial and error, I was able to create the fireplace shell. The space for the fireplace measures: 55.5” W x 23.5” H x 8.5” D
Building the Surround
Supplies List: I had the lumber cut at the store for easy transport. Then I cut each piece to size as I worked.
Two 1x8’s cut at 60” each (the top)
Two 1x8’s cut at 30” each (the sides)
Two 1x2’s cut at 60” each (added to the top to create 8"depth)
Two 1x2’s cut at 30” each (turns out I didn’t need these 🤦🏽♀️ )
Two 2x4’s cut at 50” each (for inside moveable carriage)
Two 2x4’s cut at 20” each (for inside moveable carriage)
Twelve 1/2" square dowels (Six attached on the inside lip of the enclosure to create a resting place for the beveled plywood. And the remaining 6 were cut to size to create finishing details on the face of the fireplace surround.)
*Note: Keep in mind that the thickness of lumber is rounded up to the nearest whole number. So, a 2x4 is really a 1.5” x 3.5” piece of lumber.

“As I novice woodworker, I always try to give myself a “way out”—options— just in case things don’t work as planned. ”
The next step was to create a movable carriage for the fireplace box, allowing for design modifications if needed. The moveable carriage allowed me to recesses the fireplace box to create the beveled fronts - if I could figure it out.
But if I couldn’t figure out how to cut the bevel pieces, I could always move the insert forward to make it flush with the enclosure, nail it into place, and create a flat paneled front instead. SMART right??!

Determining the Bevel
This was difficult because not only did I have to find the correct degree of angle, but there was also a slight pitch.
Tools Needed:
A sliding T-bevel or a digital angle finder - To locate the degree of the angle (You will thank me later)
Sawset Protractor - To find the angle on the saw. (Again, you’re welcome)
A pencil
A miter saw, handsaw, or jigsaw.
Wood filler - To blend the seams and cover the seam tape
Mesh seam tape - To strengthen the seams
Carpenter’s hand chisel - To tighten up the fit if necessary.
Finishing Touches
My goal was to create a finish reminiscent of soapstone or a soft black marble. Here are the tools I used to create the look.
Add 1/2 square dowels to the front of the fireplace to create architectural interest.
Prime - Quartz primer was used here
Paint - Venetian plaster
Add Detail - Soft white veining added with venetian plaster
Seal (optional) I opted NOT to use the sealant, as I wanted a matte finish

